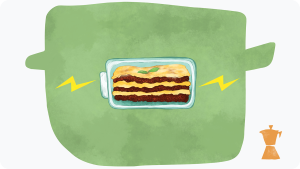
Step-by-step instructions for baking your own sourdough loaves, with a handful of tips and tricks.
Bread. It’s great isn’t it? But what if I told you it could be even better – and also come with an air of (at least fairly deserved) self-satisfaction? Welcome to the wonderful world of making sourdough bread.
While the process admittedly takes a lot longer than picking up some bread from a supermarket or bakery, it’s much more satisfying to eat something you’ve made with your hands and (at least in my experience) you just can’t beat the taste and texture of homemade bread.
If I have an evening to myself, I often find myself preparing a dough to bake the next morning. The routine of coming back to the dough to keep stretching and preparing it gives a nice rhythm to the evening, a feeling of proactivity and it’s easy to do alongside watching a film or curling up with a good book.
The first thing to say is that in order to make sourdough bread you will first need a sourdough starter. If you don’t already have one of these – or are unsure what one even is – don’t worry; we have a helpful guide to help you make your own right here. So check that out first and come back with your starter in hand!
If you’ve got your starter already, then here we go:
How to make sourdough bread: a 10-step guide
Ingredients
- 100g sourdough starter
- 10g salt (ideally sea salt flakes)
- 500g strong white bread flour
- 300g tepid water
Equipment
- Mixing bowl
- Proving basket
- Pan in which to bake the bread
- Small baking tray or oven-safe dish
- Baking paper
- Cooling rack
- An elastic band
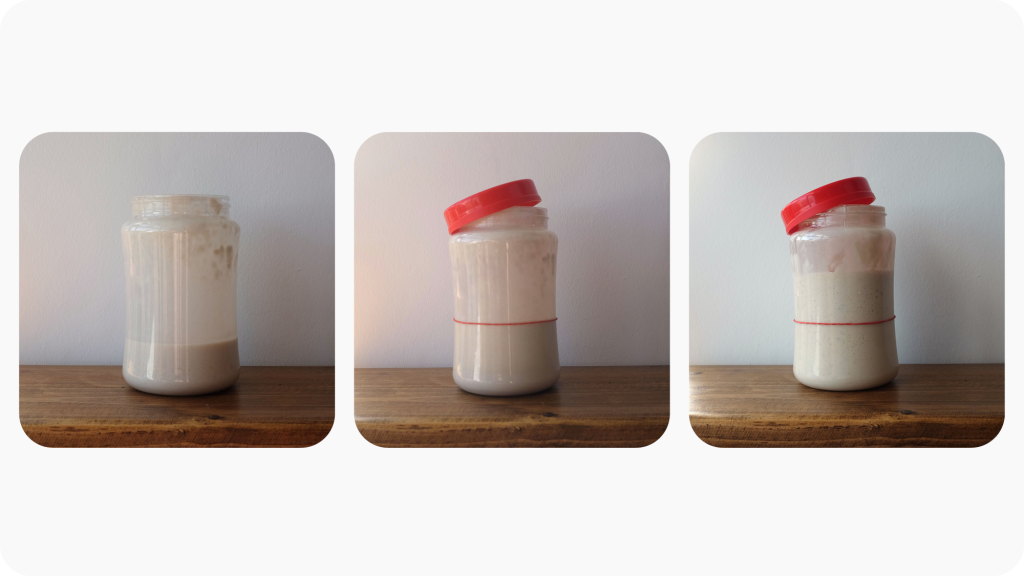
1. Feed your starter
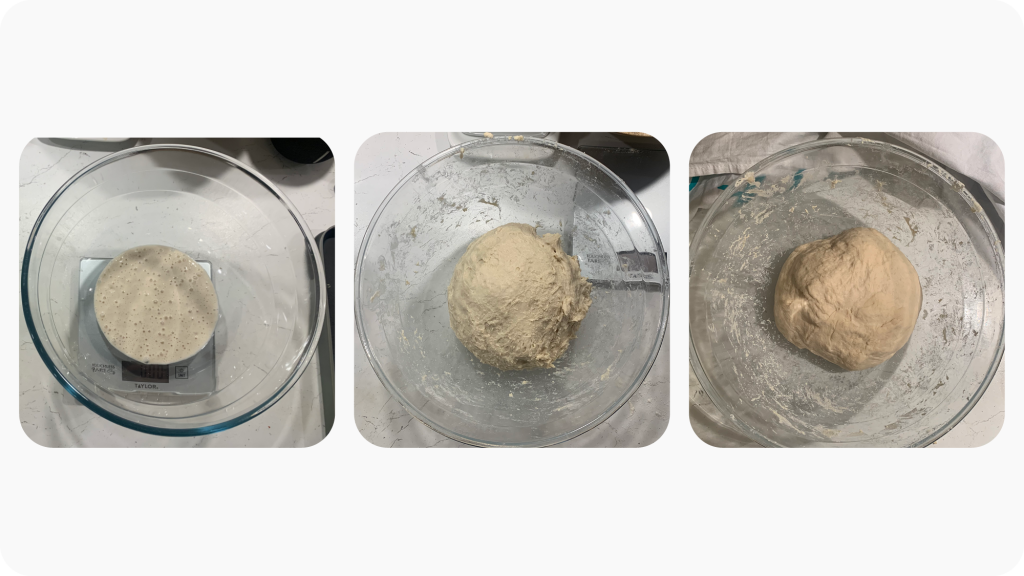
When you plan on making bread, give your starter what I like to call a ‘big feed’: mix in a mixture of 100g flour and 100g water. I just use plain flour for this, but I would recommend using strong white bread flour if your starter is still less than a month old and therefore less established.
Once you’ve fed the starter, leave the jar at room temperature with the lid slightly open until it has doubled in size. In order to measure this, put an elastic band around the jar at the level of the starter before leaving it to one side and compare against this when the starter rises. This process usually takes 2-3 hours (as long as the starter has risen by at least a third it’ll be fine to use, you don’t have to be too precise with your measuring).
2. Mix all the ingredients in a bowl
Once your starter has risen enough, give it a stir and then add 100g of it into a mixing bowl, along with 500g of strong white bread flour, 300ml of tepid water and 10g of salt.
Mix all of the ingredients together (ideally by hand) until it forms a rough and sticky dough, then leave the dough at the bottom of the mixing bowl and cover the bowl with a tea towel.
3. Leave to autolyse for half an hour
Once you’ve put a tea towel over the bowl, leave the dough for half an hour to autolyse (which means to allow gluten bonds to start forming in the dough).
It’s worth noting at this point that this recipe is slightly cheating. Technically the word “autolyse” only refers to leaving a mixture of just flour and water to sit for a while, with the salt and starter added afterwards. In my experience adding the starter and salt later makes the process more difficult (especially in terms of evenly distributing the salt in the dough). Mixing everything together in the way I’ve described is the method I’ve always used, and I’ve baked some beautiful loaves this way.
If you wanted, however, you could mix just the water and flour in step 2, and then add the starter and salt after the mix has sat for half an hour before moving onto step 4.
4. Pick up and stretch the dough 4 times (15 minutes between each)
To start developing the strands of gluten within your dough, you need to stretch it. To start this process, pick your dough up and stretch it over the bowl. I find it easiest to do this vertically, stretching it into something resembling a long thick noodle (a bit like if you were holding a rolling pin pointing down in front of you).
Be careful not to stretch it so much that the dough breaks, as this will have a negative impact on the development of the gluten. If the dough does break, it’s not a total disaster. Just squeeze it back into a ball and strat stretching it again with a bit less force.
Once you have stretched the dough out, put it back in the bottom of the bowl, folding it over itself a couple of times so it’s in a lump at the bottom. Then rotate the bowl 90 degrees and do the ‘pick up and stretch ‘ process again. Overall you want to do this 4 times so you’ve stretched the dough from every side.
Do this whole process (stretching the dough from every angle) 4 times, leaving the dough for 15 minutes in the bowl covered by a tea towel each time. As you do this, you should feel the dough becoming easier to work with, more smooth and less sticky.
5. Stretch the dough into a flat sheet 3 times (half an hour between each)
Time for a different kind of stretching. Spread a bit of regular flour (2-3 generous pinches) on a large flat surface (ideally a clean counter top or baking mat), then take the dough out of the bowl and put it in a ball in the centre. Now stretch it with your hands as much as you can, aiming to get the dough as thin as possible without breaking it. My baking mat is 60cm x 40cm and I aim to stretch the dough so it covers the entirety of this space.
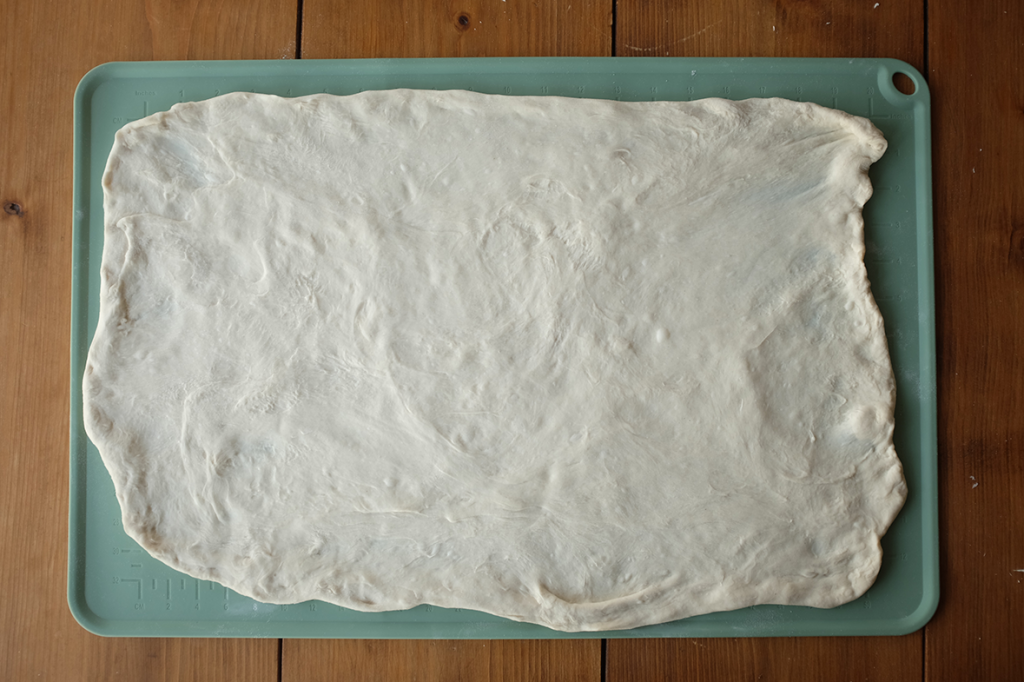
After you have stretched the dough out in this way, fold the corners into the middle to create a circular lump. To shape the dough, pick it up and fold it into itself on the underside of the dough.
To visualise what you’re aiming for, try this first: cup your empty hands in front of you with your palms facing towards you, then roll your fingers towards yourself as if they’re going around the side of two imaginary mugs. The effect you get as your fingers move towards you and the backs of your hands come together is the same movement you want to achieve in the dough: folding it up and into itself, stretching it into an oval shape a bit like a large potato.
Once you’ve shaped the dough by doing this a few times, place it back in the bowl and cover with a tea towel again, leave it for 30 minutes, and then repeat the process of stretching it out and folding it back into a potato shape. You’ll need to do this 3 times in total, adding a little bit of flour to the surface each time to stop it from sticking – but be careful that you don’t add too much as you don’t want the dough to dry out.
As you stretch the dough you should feel the dough becoming much less sticky, and you might even see a few small air pockets develop as you stretch the dough out. It’s also common to get a bit of ‘bounce back’ as you stretch it; this is fine, just keep stretching it out and you’ll be able to work it into a flat sheet.
6. Put in a proving basket and score
Before stretching and shaping the dough for a third time, put a decent amount of flour in a proving basket and spread it around so there’s flour in the gaps between the wood on the bottom and first 2-3 layers on the side. Then stretch and shape the dough for the final time before putting it in the basket.
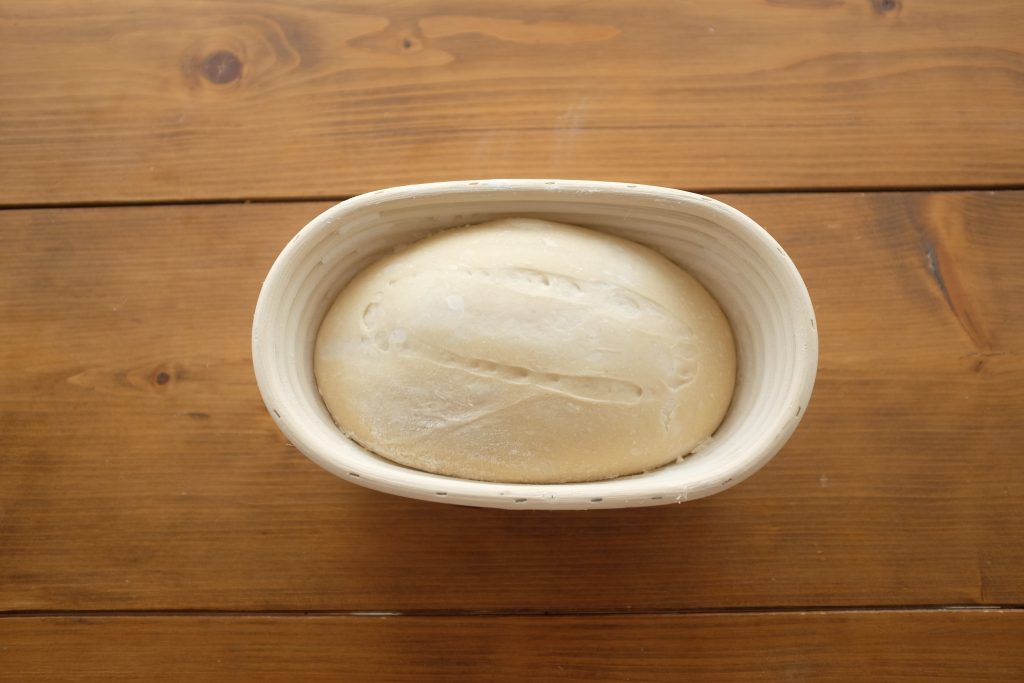
Take a sharp knife and score a rectangle into the top of the dough (about 2/3 of its length). You only want to cut about half a centimetre deep at most, and you’ll find it much easier to cut the dough if you put a little bit of olive oil on the end of the knife.
7. Leave to prove (around 3-4 hours, or overnight in the fridge)
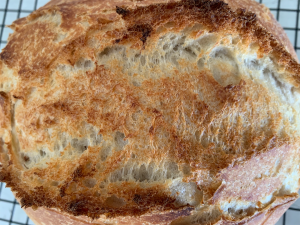
The dough now needs to be covered and left to prove, which is when the dough rises as the yeast in it ferments and causes gas to be released. All the stretching you’ve done means that the gluten strands in the bread are able to stretch and hold this gas, which is what causes the bread to rise and is the reason for the warren of small (and sometimes large) holes found in sourdough bread.
For covering the proving basket and dough, it doesn’t really matter what you use as long as it’s not airtight, but it’s best to use something that won’t come into contact with the dough as it expands. I use a large mixing bowl that rests on the edges of the proving basket and leaves some space for air to get in at the bottom, a friend of mine uses a large shower cap – you can be creative here.
Depending on whether you’re planning to bake your loaf on the same day or the day after, there are different steps to take when proving:
- If you’re baking your loaf today, leave it at room temperature for 3-4 hours. As with making a sourdough starter, the precise time depends on the temperature and humidity of the environment, but what you’re looking for is that the dough has roughly doubled in size.
- I often make dough across the course of an evening and then bake the loaf the next morning. If doing this, prove it for a short period of time at room temperature (up to 1 hour, but half an hour will do), and then put it covered in the fridge overnight. In the morning take it out of the fridge and leave it for half an hour before baking. With this method it’s common for the dough to still be a little on the small side (not quite double in size), but it still bakes perfectly.
In my (limited) experience, proving is something best classified as ‘more art than science’ – as environmental conditions determine how long the process will take and so it’s hard to give definitive answers on timing. The best thing to do is to pay attention to your dough the first couple of times you make sourdough bread this way and adjust timings if processes take longer/slower in your home.
8. Prepare the oven and baking pan
To bake your bread you will want an oven-safe pot with a lid (I use a 26cm round aluminium casserole dish) and a small baking tray. The small baking tray is to hold some water to make the inside of the oven humid and help the baking process. Before heating up the oven, arrange the racks inside so you can fit the pot with the lid on above the baking tray (speaking from experience, it’s a massive pain if you forget this and have to find space for burning hot trays and racks).
Leave just the baking tray in the oven, put 1-2 cups of water into it, and turn the oven up to 250 degrees celsius. While the oven is heating up, sprinkle some rice flour on the bottom of the pan (to stop the bread sticking to it) and create a ‘cross’ out of two long strips of baking paper going across the middle. These strips don’t impact the baking process, but are there to make it easy to lift the bread out at the end when the pan is hot.
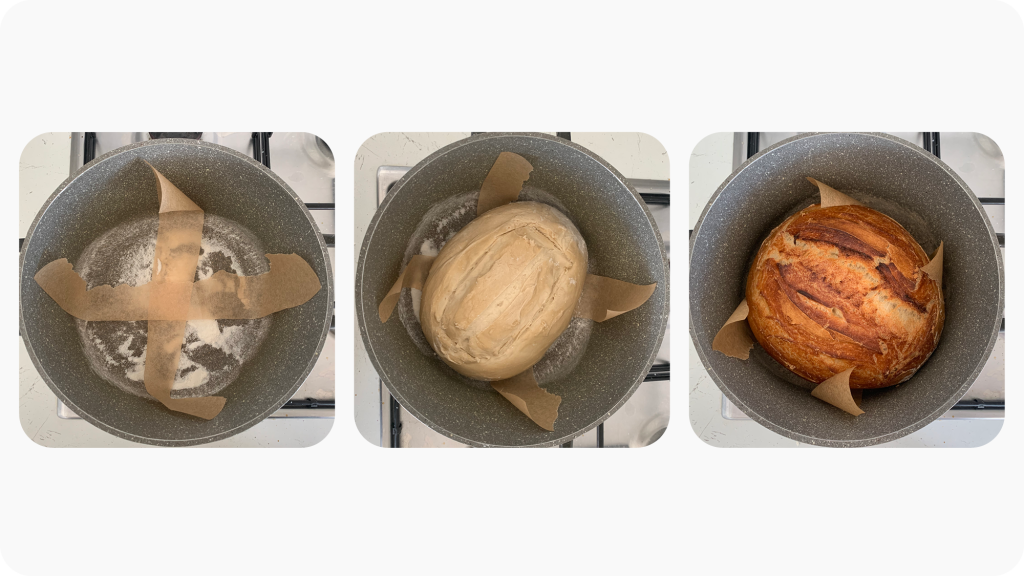
Take the cover off the proving basket and score the dough one last time, this time with one line down the middle – leaving about an inch at either end unscored. As before, you’ll find the knife cuts better if you put a little bit of olive oil on the end.
Tip the dough out of the proving basket into your hand (you may need to shake it a bit depending on how well you floured the basket) and place the dough into the middle of the pan with the scored side facing up.
9. Bake the bread
Once the oven has heated up, turn it down to 220 degrees celsius (make sure to do this as baking at too high a temperature can mean your bread won’t rise). Place the pan with the lid on into the oven – being careful to lean away when you open the door as the water vapour inside will be very hot.
Bake at 220 with the lid on for 25 minutes, and then take the lid off (at which point you should see a beautifully risen but quite pale loaf). Bake for a further 15 minutes with the lid off so that the bread goes a nice golden brown colour.
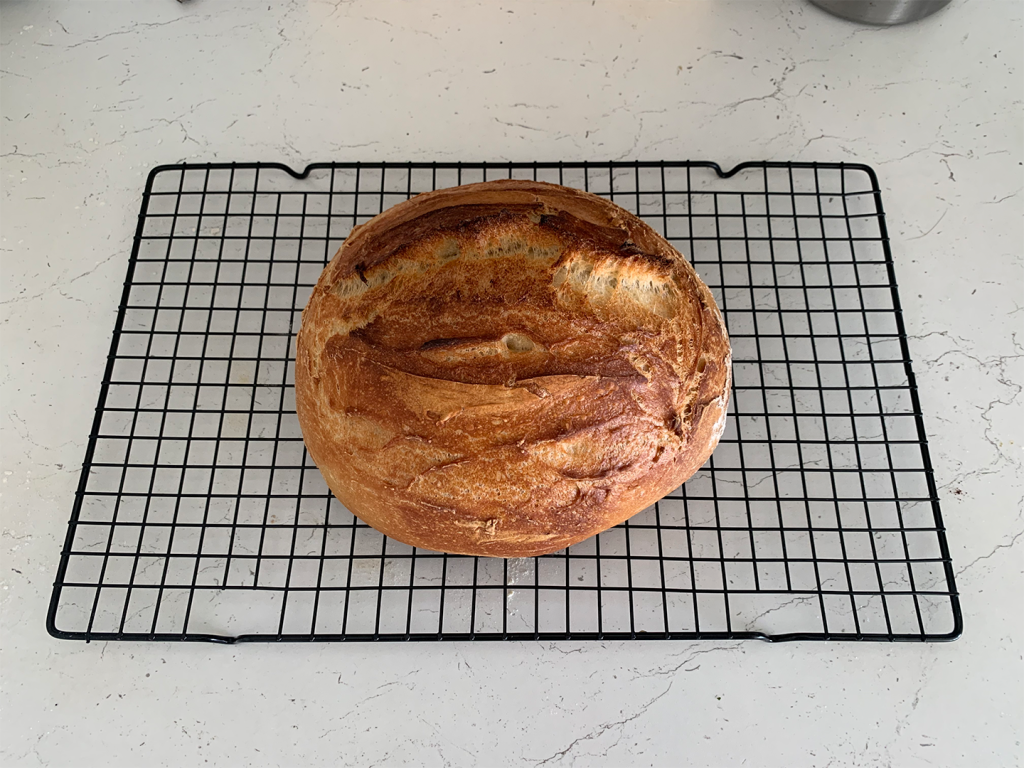
10. Leave to cool
Take the pot out of the oven, and put it beside a cooling rack. Carefully lift the bread out of the pot using the ends of the baking paper and place it on the cooling rack for a few hours – I would say at least 2 hours, ideally longer. Some people say 4-6 hours.
You can now cut into it and see the bubbles running through the dough. I always find this very satisfying, as it’s evidence that all the stretching and folding you’ve done has had a real effect.
Congratulations, you’re officially a baker! The bread will last around 5 days to a week at room temperature, longer in the fridge, and you can also slice and freeze it. Remember to keep feeding your starter and see you back here when you’re ready for round 2!